Mini donuts are a favorite among us, and they’re great fun for children to enjoy. However, preparing them might not be so simple.
Making sweets in miniature might often require a lot of skill and patience. Likewise, donuts do not stand out.
But you can be saved by technology. Dash offers a lovely little donut maker that will keep you from trouble; you no longer need to make the batter to cook it in the oven or the fryer.
We will discover how to create the ideal recipe in this article so that your little doughnuts will steal the show. Let’s get going!
The Dash Mini Donut Maker
An iconic name in household appliance manufacturing is Dash. Its famed waffle machines are currently popular on Tik Tok, Instagram, and Facebook.
Dash recently released a machine to produce little donuts that will be the talk of the neighborhood and are already clogging social media with videos and reviews of all types.
So that you do not stay out of the wave and the fever to make mini donuts, we want to make a complete review of this great appliance and provide you with our recipe to make mini donuts in these fabulous machines that leave aside dirty bowls and kitchen utensils every time you want to make some treats.
Price
The first thing we should note about this small donut maker is that it is rather inexpensive. You may find this device for anywhere between $20 and $25 if you search sites like Amazon.
If you want to order it online, you should check the shipping costs for each nation; however, if you live in the United States, there are no additional fees beyond $50. If so, you may order a few of these devices at once and keep one as a gift.
They are ideal as wedding presents or birthday presents for someone who enjoys cooking; I can tell you that they will be grateful for the gift because using this machine to make donuts is so easy that you won’t believe it until you try it.
Design
These adorable small doughnut makers have a nostalgic retro look (inspired by the 1950s) that is already present in several Dash line products.
The most popular color is a wonderfully retro aqua, but they are also offered in white, cream, pale yellow, and a quirky donut print design. They are ideal because they are no larger than a conventional waffle iron.
Features
- Safety comes first, so Dash made sure your fingers are protected and that you can never burn yourself by designing this appliance with the simplest opening possible away from the hot iron.
Since we’re addressing safety, it’s important to note that this tool has been made to be user-friendly for kids as well.
Although it should always be used under the supervision of an adult, kids in the family will have no trouble picking it up because it is such an intuitive instrument.
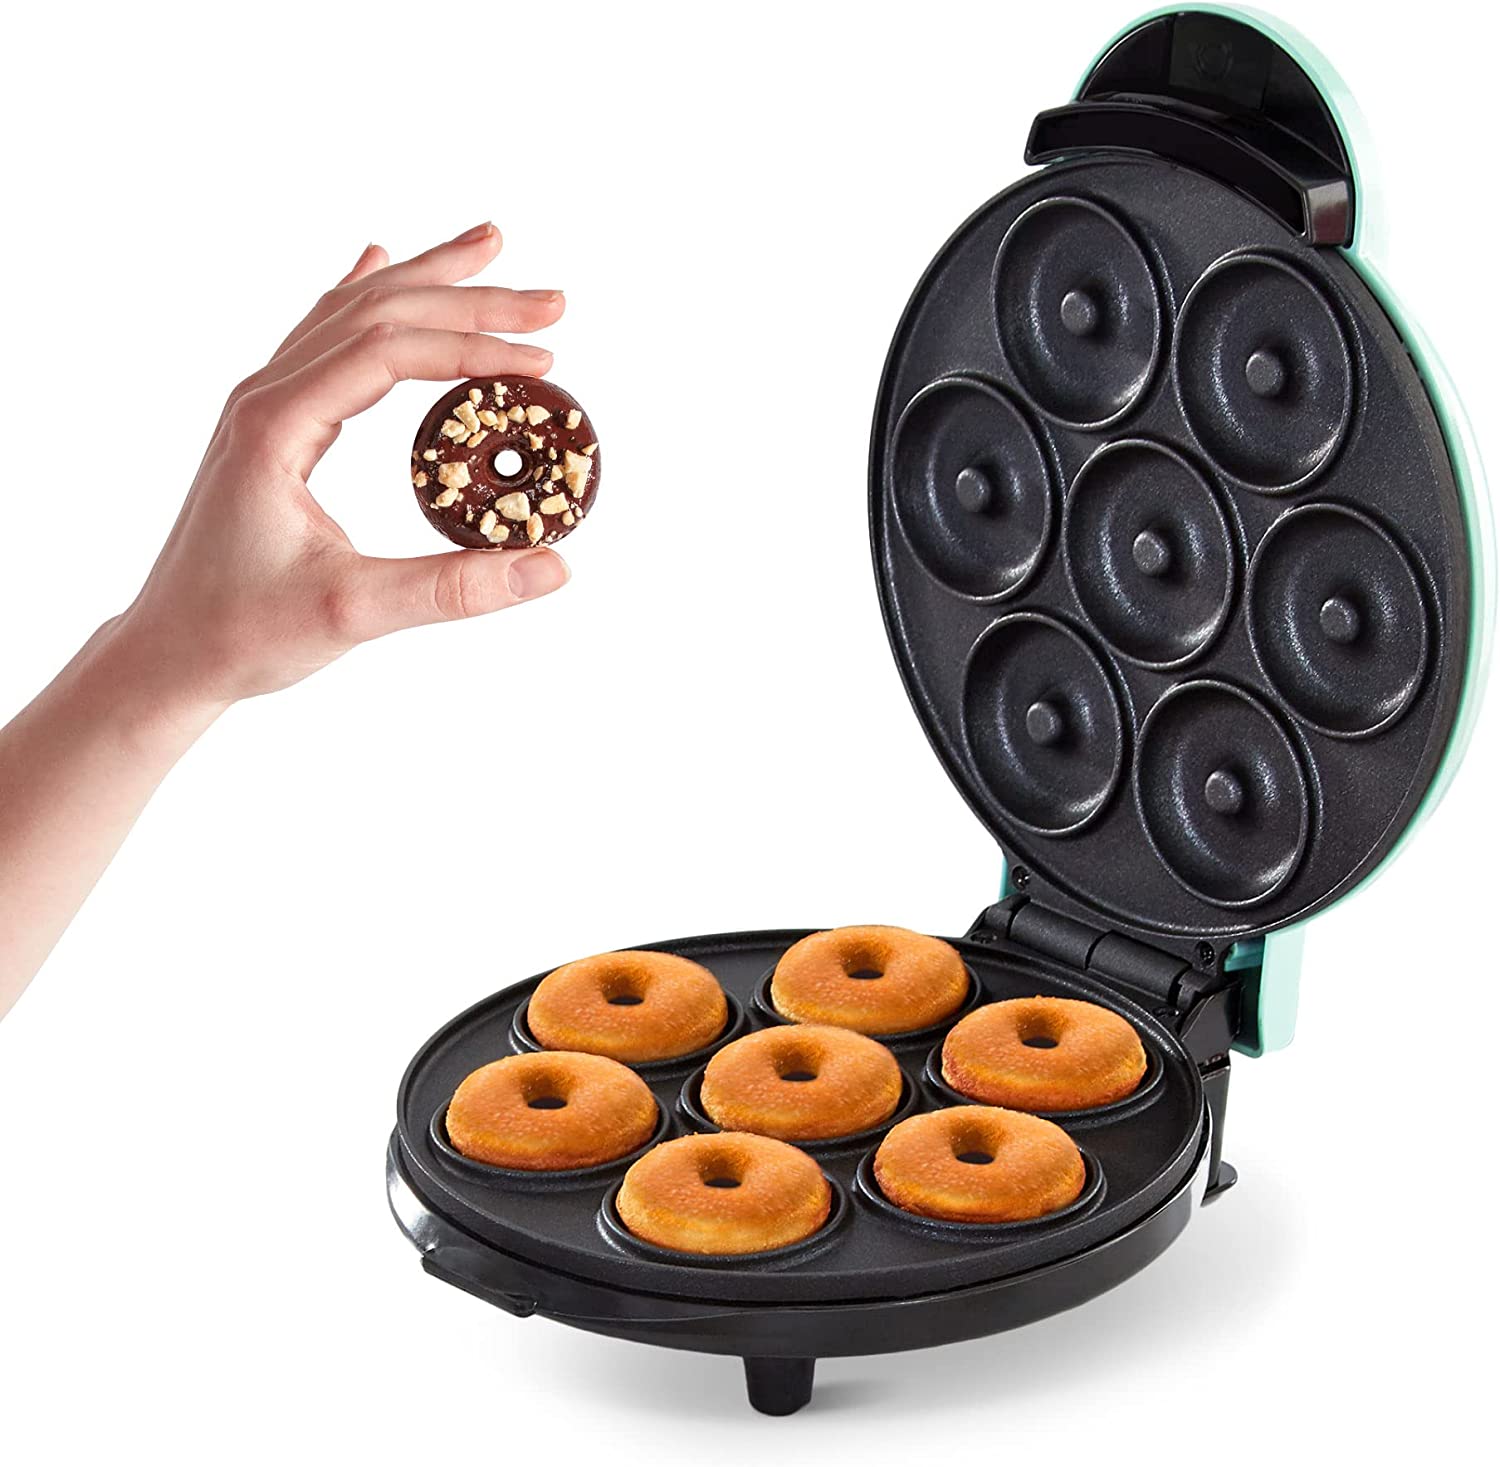
- It is composed of non-stick plastic and has seven rings for small donuts. By doing this, you can be sure that the doughnuts will remove without difficulty and that the sides won’t be clogged with dough.
The small donuts will be fried on an 8.5-inch round griddle.
- This appliance’s non-slip foot grip, which offers stability and stops it from falling off the counter or kitchen table, is another feature we adore.
Once more, this little detail makes it the perfect culinary tool for kids to use to assist them in making the mini donuts and familiarize themselves with the kitchen.
- Finally, it includes a light that will illuminate when it is plugged in and turn off when it is time to start cooking. It will remain on as you cook the little doughnuts and resume changing color until they are finished.
You won’t have to wait more than two minutes for your little doughnuts to be ready because the process is so quick. Before the next batch is served, it is the perfect opportunity for you to decorate a batch of doughnuts.
* It’s crucial to keep in mind that while these items were designed to work with American electrical current, it’s likely that they will require an adaptor to work with other types of voltage. It has 760 watts and 120 volts of power.
Donut Recipe for The Dash Mini Donut Maker

Yeast is used in the classic donut recipe, which needs to rest for at least an hour or until it has doubled in size. Then, before you can cook them, you must cut them with a mold and give them another 30 minutes to inflate.
But not with these donut manufacturers. Although they cook quickly and practically instantly, the dough’s recipe must be altered because it does not contain yeast for the same reason.
Here, we’ll give you a basic recipe that you may modify with additional ingredients to make gluten-free, apple cider, or chocolate-flavored cookie dough. There are countless options.
Ingredients
- 2 cups all-purpose flour
- 1 cup sugar
- 50ml oil
- 2 tbsp of vanilla extract
- pinch of salt
- 1 cup milk
- 3 large egg
- 2 teaspoons of baking powder
Instructions
- Sift all the dry ingredients (flour, salt, and baking powder) into a medium bowl. You can pass the ingredients once through the strainer, but we recommend that you do it three times so that the dough is finer.
- Whisk all the wet ingredients in a mixing bowl. These are eggs, sugar, and oil. Once they are well mixed and all the sugar grains have been diluted, we mix them with the dry ingredients.
- Beat the mixture and add the milk little by little until there is a light and homogeneous mixture. You must take care that there are no lumps of flour in the mixture. This process is usually done with a hand or electric mixer, but you can also do it in a blender to make sure everything is mixed well.
- Pour the mixture into a zip log bag if you don’t have a pastry bag. You must remove the air in the upper part before using it.
- Plug in the Dash Mini Donut Maker and wait for the light to turn off, indicating that it is ready to cook the donuts.
- Cut with scissors one of the ends of the plastic bag. It is important that you do not make the hole very large, since you run the risk of overflowing the dough and that your donuts do not come out with a hole in the middle or have the middle part raw.
Important: Furthermore, it shouldn’t be a tiny hole, since pressing too hard could cause the bag to rip and create a mess in the kitchen. We advise you to start small and work your way up; keep in mind that a minor cut can always be fixed, but a major one cannot.
- Pour a small amount of the mixture into each mold. Mini donuts come in seven different forms. If you add additional dough, it will spread on the sides, forcing you to cut the remaining dough and clean the machine. It is advised that you fill the mixture to the level of the mold. Be as precise as you can.
- Wait a total time of 2 minutes until the Dash Mini Donut Maker’s light changes color. After that, remove the cover and use a fork or toothpick to scoop out the doughnuts. Even though metal is sticky, some individuals want to be extra cautious and use cooking spray or melted butter to ensure their molds will come off easily.
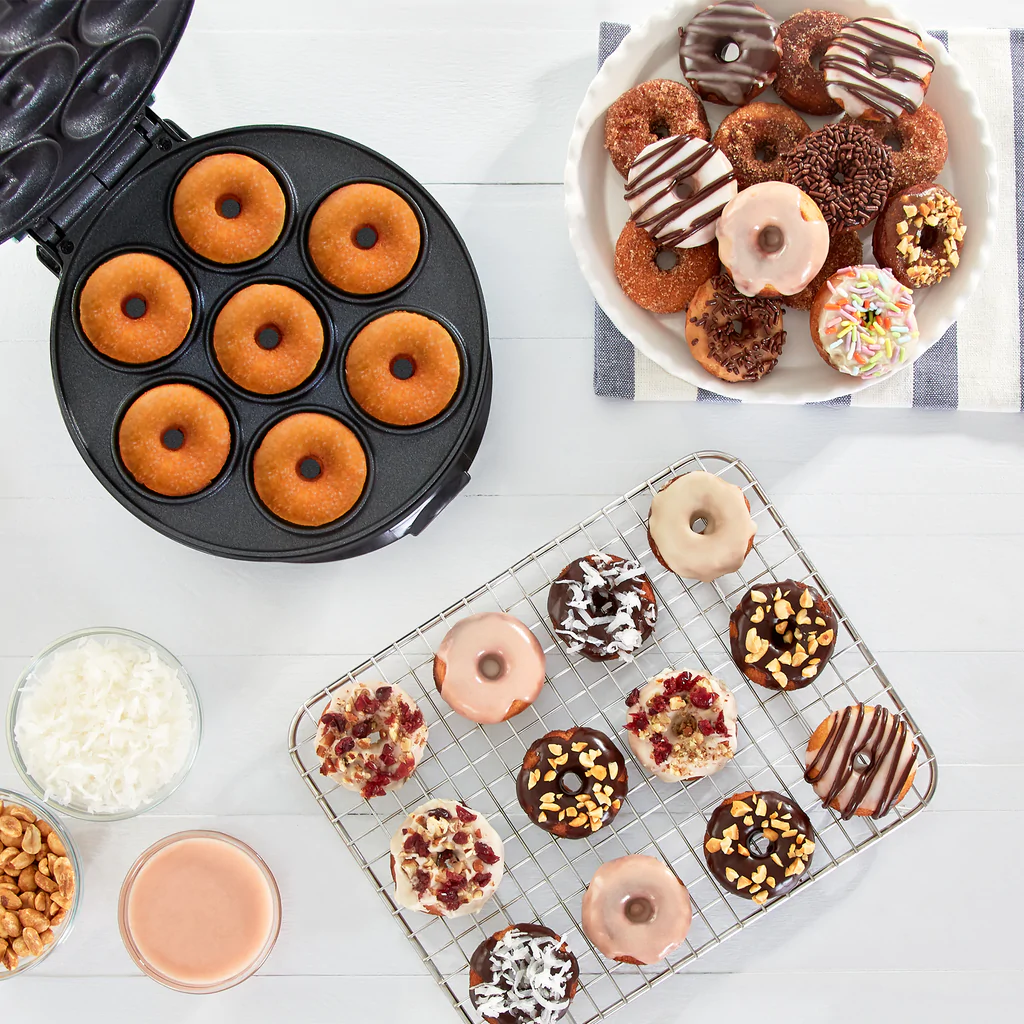
- Dip them in melted butter, then roll the donuts in a cinnamon-sugar mixture for a simple and easy finish. You can also improve the appearance of your donuts by previously preparing a sugar glaze with the flavor you want. Lemon, strawberry, chocolate, the sky is the limit.
- Give it a final touch by adding sprinkles of any color or flavor. You can also decorate it with other ingredients such as chocolate chips, grated coconut, finely chopped nuts, or dehydrated fruit.
Important: Keep in mind that following this recipe is quite simple, and it can be a wonderful activity to do with your kids as a whole family activity.
Final Words
For a game with your kids’ friends or their birthday celebration, you could also prepare multiple batches of little doughnuts and let the kids decorate them however they like.
We can guarantee that they’ll have a great time and remember it for a very long time. Making kids feel capable of cooking contributes to their personal growth, increases their sense of integration with household chores, and gives them new skills they can use to advance their education in the future.
We sincerely hope you found this information to be useful. Do not hesitate to purchase one of these donut-making machines; it is a very practical and simple device.
If you have unexpected guests, it will save you from multiple kitchen rushes and help you come up with activities to do with your kids.
We always advise you to experiment with our recipe and try different combinations until you find your favorite. Let us know about your experience so we can motivate more people.
Used my mini donut maker. They were perfectly cooked in 2-3 minutes. When sampling we determined these are a new favorite. Serving tomorrow and I plan on frosting them with a cream cheese frosting, they were very good plain.
I have been looking for a good recipe to use with my dash. Will be trying this one soon. Thank you.
First, I’d like to say thank you for providing a simple recipe that can be adjusted to add in ingredients for a variety of flavors and to substitute for dietary reasons.
The only thing with the recipe is with step 2:
“Whisk all the wet ingredients in a mixing bowl. These are eggs, sugar, and oil. Once they are well mixed and all the sugar grains have been diluted, we mix them with the dry ingredients.”
The next step states to beat mixture while adding in the milk. Now, for myself, I included all wet ingredients, then added in the dry ingredients a little at a time as I used my hand mixer. However, for some people who follow the recipe to an exact -T-, there is no inclusion of the vanilla extract. This wasn’t an issue for me at all, but for some people, they may be confused on the instructions.
The recipe turned out wonderfully and we used a variety of add-ins.