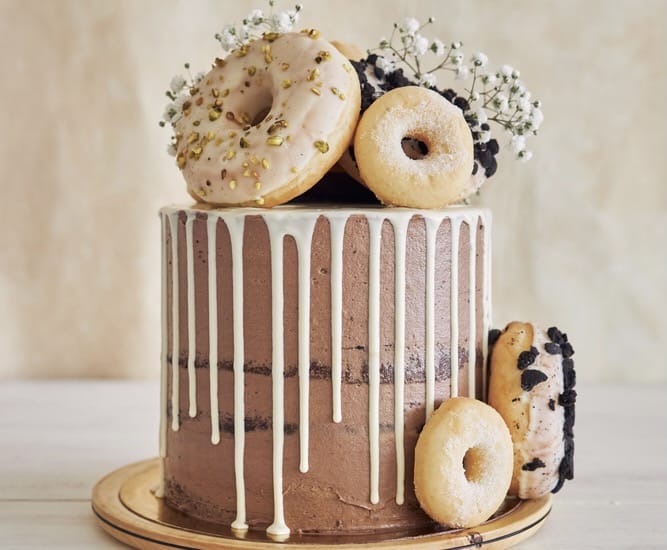
What could be better than eating donuts or cake? The answer is eating a donut drip cake. Donut drip cakes are cakes with donuts on top with delicious decorative drips. They are easy to make, even for a beginner baker, and look as good as they taste.
For this article, we have sourced some delicious donut drip cake recipes and a video tutorial for you so you can try making your own donut drip cakes. They are winners at parties or make a simply decadent dessert. But first a little a bit of history.
The History of Cakes and Donuts
It is not known who first combined drip cakes with donuts, but historians have traced the roots of donuts and cakes back several millennia.
Cakes – the history
The credit for the first cakes goes to the ancient Egyptians who made round, flat, unleavened bread that was cooked on top of a hot stone. They were also the first civilizations known to have used yeast in baking over four thousand years ago in 2600 BCE.
The ancient Romans were also skilled bakes and the Roman Empire had its own Baker’s Guild, which was established around 168 BCE. They even had an oven goddess, Fornax, who was celebrated with a yearly festival.
In the Middle Ages, the wealthiest Europeans would eat rich cakes made in exotic colors and it is said that the first birthday cakes were served in Germany during that era. They would celebrate children’s birthdays with cake, a tradition that has since become a worldwide tradition.
It wasn’t until the 18th century that cake-making became more accessible to everyone. More homes had ovens and key ingredients had become cheaper and easier to access, making it possible for people with lower incomes to bake cakes. The introduction of baking powder in the 1800s transformed yeast-based cakes into the light cakes we know now.
For a more detailed history of cakes, visit the Food Timeline.
Donuts – The history
Americans are often credited with the invention of donuts. However, donuts in different variations existed long before they made their way to the United States.
Though many countries have their take on donuts, such as loukoumades in Greece, beignets in France, and rosquillas in Spanish-speaking countries, the most likely ancestor of the modern donuts were the olykoeks that the Dutch settlers introduced to America. They made balls of cake fried in pork fat at least as early as the mid-19th century.
The original donuts used to be filled with fruit or nuts because the outside would cook faster and leave the center raw. Filling them with fruit or nuts avoided this problem. It is also a possible explanation for their name: doughnuts = dough with nuts.
How did donuts evolve from that to having a hole in the middle? The story goes that a New England captain, who didn’t like the filling, told the cook on his ship to remove the centers and cook the donuts with a hole in the middle.
For more information on the historical roots of donuts, visit The Spruce Eats.
Who made the first drip cake?
The first drip cakes were made by an Australian high school teacher turned cake queen, Katherine Sabbath. She was inspired to create her unique designs by the TV show Goosebumps.
Recipe suitable for beginners
The first recipe we want to share with you comes from The Coffee Mum. She made her first donut drip cake when her daughter asked for a donut-themed birthday party. Instead of buying a cake as she has usually done, she made one herself.
What makes this recipe so easy is that it is not made from scratch. It is more a get all the ingredients and put them together version of a donut drip cake. For those who want to make all the parts of the cake, we will share recipes for the cake and donuts afterward.
The ingredients you will need to make The Coffee Mum’s donut drip cake
1 box of cake mix
Buttercream icing
Sprinkles
Heavy whipping cream
Donuts and munchkins
Melting wafers
Step-by-step instructions on how to create The Coffee Mum’s donut drip cake
- Start by baking the cake using the instructions on the box. Divide the cake mixture into two equal size round cake pans. These will be your cake layers. If you do not have two pans, you can use a single pan and when the cake has cooled, use a cake leveler or a long knife to cut it in half.
- Once the cake has baked, leave it to cool. If you want to get it to cool quicker, you can put it into a fridge where it will take about an hour to cool. You can use a toothpick or a skewer to check your cake is ready. Push the toothpick into the cake and pull it out. If it comes out clean, your cake is ready.
- Using a spinning cake stand, if you have one, ice the top of one of the small round cakes and then stack the second layer on top of it. If you do not have a spinning cake stand, don’t worry, you can have the cake on a plate and rotate the plate instead.
- Ice the rest of the cake until it is covered in smooth icing. Use an offset spatula to get it as smooth as possible. Leave the cake to sit in the fridge overnight before moving to the next step.
- Make the ganache in a double boiler. Place the melting wafers on the top of the double boiler. You can also use chocolate instead of the melting wafers. Let the wafers or chocolate melt and slowly add heavy whipping cream. Mix until you get a thin enough consistency for dripping.
- Pour the ganache into a squirt bottle or a bowl ready for decorating.
- Take your iced cake from the fridge and drizzle the ganache using a spoon or a squirt bottle over the top and edges of the cake, spinning the plate or the cake stand at a low speed as you go. We will share more instructions on creating the drips using either a spoon or a bottle towards the end of the article.
- Finish by topping the cake with donuts and munchkins.
Recipe suitable for those who want to do it from scratch
For anyone who would like to make the cake from scratch, here is a recipe from Chelsweets.
The ingredients you will need to make the cake
3 cups all-purpose flour
3 cups granulated sugar
2 1/2 tsp baking powder
2 tsp vanilla extract
1 1/2 cups buttermilk, room temperature
1 cup egg whites or about 7 egg whites, room temperature
1 cup or 2 sticks of unsalted butter, room temperature
2 Tbsp vegetable oil
1 tsp salt
The ingredients you will need to make the frosting
2 cups unsalted butter, room temperature
1 Tbsp vanilla extract or vanilla bean paste
2 Tbsp heavy cream or whipping cream
7 cups or a 2lb bag of powdered sugar
1/2 tsp salt
The ingredients you will need to make the colorful chocolate ganache
1/3 cup heavy cream
1 cup white chocolate chips
gel food coloring
For detailed instructions for each stage of the cake, click here.
A donut recipe
To make the donuts to decorate the cake, and a few extras, you can use this recipe from the New York Times.
1 ¼ cups milk
4 ¼ cups all-purpose flour, plus more for rolling out the dough
8 tablespoons (1 stick) butter, melted and cooled
2 eggs
¼ cup granulated sugar
2 ¼ teaspoons (one package) active dry yeast
1 teaspoon salt
2 quarts of neutral oil, for frying, plus more for the bowl.
The detailed instructions on how to make the donuts, click here.
How to create the drips on your cake
There are two different methods to get the drips on your cake. The first is the spoon method, which is great because you don’t need any special tools. To create the drip effect using a spoon, you take a tablespoon of ganache and carefully pour it over the edge of the cake.
The second method is the squirt bottle method. They are quicker than the spoon, as you don’t need to keep refilling the spoon with the ganache. It is also the tidier method because you don’t end up with drippings of ganache on your worktop as you might do when using a spoon.
For an excellent demonstration of how to use the drip techniques, we recommend this video from Neurotic Mom Bakes.
Conclusion
The recipe ideas we have shared with you for donut drip cakes are just some ways you can make your own donut drip cake. You can make so many variations of this cake by changing the flavors of the cake, the donuts, the icing, the filling between the layers, and the ganache. Let your creative ideas loose.
We hope we have inspired you to try making donut drip cakes and answered questions you might have had about them. However, if you still have questions about them, write them in the comments section. We also have frequently answered questions that you might like to check out first.
FAQ
I have leftover ganache. Can I do anything with it?
You can store the ganache in the fridge where it will last up to a month. When you are ready to use it, heat it in the microwave until it is the right consistency. We recommend doing this in 15-second intervals.
How can I make a ganache in different colors?
You can either use white chocolate with food coloring. Alternatively, use candy melts. Just choose the color you would like and combine it with heavy whipped cream.
